I started to experiment with these rolls in preparation for a Portuguese-themed lunch with friends who spent some time living in Portugal years ago. After Mike insisted it was impossible to get papo-secos like they make them in Portugal, I was determined to recreate them.
My Portuguese friend, Alice, lent me a brilliant cookbook called Cooking the Portuguese Way in South Africa by Mimi Jardim, and there I found a recipe which explained the secret ingredient – potato. The potato dissolves completely (no chunks of it all, in case you’re wondering) and I’m guessing that’s what makes the rolls soft and chewy at the same time.
We served them with a main course of Feijoada (Portuguese pork and bean stew), but you could equally well dip pieces in olive oil and balsamic vinegar as a snack, or fill the rolls with all sorts of delicious things. And I’m happy to say I was assured by those in the know that they came out very authentically! 🙂
PRINT RECIPE (Print-friendly version)
Ingredients
- 4c cake flour plus extra
- ½t sugar
- 1t salt
- 10g instant yeast
- ½ raw potato
- 1½ – 2c warm water
Method
Grate the raw potato – you should end up with about half a cup.

Mix the flour, sugar, salt and yeast together.


Add the raw potato and stir to distribute it through the flour.

Add the warm water, starting with 1½c, and mix it in.


You should end up with a soft, roughly-mixed dough. Add a bit more warm water if it’s too dry, bearing in mind that it gets stickier as you knead it. (I actually added a bit too much water here – luckily it’s easy to just add some more flour.)

Turn the dough out onto a clean surface sprinkled with flour, and sprinkle some more flour over it (especially if it’s a bit wet like mine) and your hands.

Knead the dough for 10 minutes (for a demo of how to do this, see here) until it’s smooth and pliable. Yes, it’s a bit of an exercise – you might try thinking of it as a moving meditation or alternatively distract yourself by listening to some good music or getting someone to talk to you while you’re busy. As you go, you may need to add a bit more flour if it gets too sticky, so keep some close by in case (not in a closed container since your hands will be all messy when you need it).

When it’s ready, it will look something like this (note the tiny piece of roasted red pepper that somehow made it’s way onto this dough from the snacks I was preparing at the same time 🙂 ):

When it’s kneaded, shape the dough into an approximate ball and place it in a large greased/oiled bowl to rise. Sprinkle the dough with a bit of flour, then cover the whole bowl with a clean cloth and put in warm place to rise for a couple of hours.

If you have a warm patch of sunlight, that’s perfect, otherwise near a heater or stove if you’re cooking something else on it. Just make sure it’s not too hot as you don’t want to actually cook it at this stage. In a pinch, I’ve turned on the oven to very low, let it warm up for a few mins, then switched it off and put the bowl in with the door open to give it a good start.
While you wait, grease a large baking tray or alternatively cover it with baking paper.
After a couple of hours (depending on the temperature), the dough should have about doubled in size.

Turn it out onto a clean, floured surface again and punch it down a bit – don’t worry, it will rise again.


Cut the dough ball into 12 approximately even pieces.

Roll each piece into an oval shape, and if you want to do it the really traditional way, create a point at each end and roll the points. They do start springing back again so roll the points very well. I didn’t roll mine quite enough so you can’t really see them once they’re baked.
Place the rolls onto the tray as you make them, so you don’t have to move them again. If you put them far apart, you’ll get individual rolls with crispy sides – personally I like soft sides so I put them close together and break them apart afterwards.
Use a knife to score lengthwise about half way through each roll (again for the traditional shape), then sprinkle with flour and leave to rise again.

The second rising takes about an hour or so – notice how they’ve grown!

Now switch on the oven to 190°C and leave it to get up to temperature. In the meantime, brush the top of the rolls with a little milk so they will colour slightly. When the oven is ready, slide in the baking tray.
Bake for 20 minutes, then check the rolls by pricking one with a skewer or small sharp knife. If it comes out clean, they’re done, but if there’s any dough on the skewer, put them in for another few minutes.


Serve warm if you can, possibly as part of a main meal, like this delicious Feijoada (not made by me but by Mike’s wife, Frances).

You can also have them as a lighter meal with a filling. They’re good cold too, preferably within the next day or so.
If you have left-overs that you aren’t going to use immediately, they do freeze well. I defrosted mine, then gave them about 10 minutes in an oven preheated to 180°C to warm them through, without actually cooking them further (otherwise they will end up quite tough).
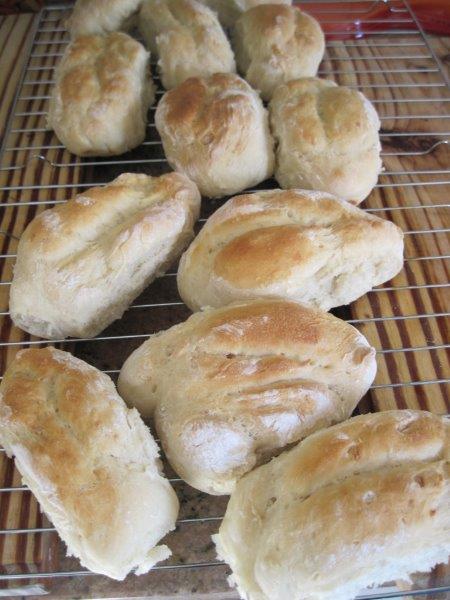
Don’t they make you want to just sink your teeth into them?!

PRINT RECIPE (Print-friendly version)
© Alexandra Lawrence and Inspired Nourishment, 2015

I’m salivating again at the thought … oh, how scrumptious!
LikeLike
Thanks for being part of the team that approved them! 🙂
LikeLike
I can vouch for the fact that the rolls were a resounding success. They were delicious straight from the oven and the left over ones were very more-ish the next day. Well done Alex for the most authentic Portuguese rolls Frances and I have eaten in over 30 years! Brought back great memories.
LikeLike
Thanks Mike! 🙂
LikeLike