This is one of my favourite dessert recipes as it’s somewhere between a mousse and a cheesecake – two of my best things!
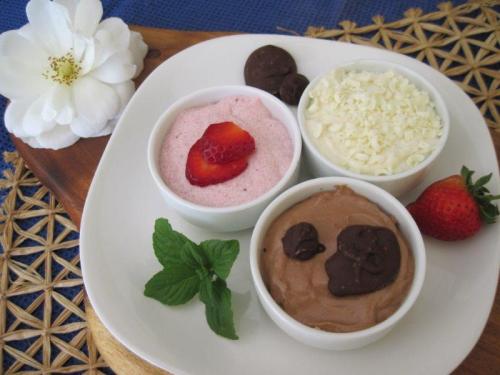
For years I’ve made it in a simple, dark chocolate version, then recently I decided to experiment with a tri-colour collection of dark chocolate, vanilla and strawberry. Because you’re working with three different flavours, you need to pay close attention to each step and do a bit of multi-tasking (which is why this recipe is classified as medium to difficult), but it worked really well and I think is well worth the trouble for a special occasion. Serve it in small bowls as it’s quite rich.
For those who aren’t feeling so adventurous, I’ve also included here the simpler, dark chocolate version, which is totally delicious on its own. Or you could check below for how to make the vanilla or strawberry versions instead. Each flavour is quite easy on its own – it’s just when you’re making three at once that it becomes more complicated.
The original recipe, which was basically just ricotta and chocolate, comes from the New Recipes from Moosewood Restaurant cookbook. I added the cream and egg whites to make it a bit richer and to lighten it at the same time. I also added the coffee and increased the chocolate content to boost the flavour intensity.
The finished product freezes really well, so it’s worth making a full batch even if you’re not going to use it all immediately. Freeze it in small individual serving bowls, either with a lid or covered in clingfilm. Then when you need one or two servings, you can simply take them out the freezer. It’s best to let them defrost in the fridge rather than at room temperature or they tend to go a bit soft, so rather transfer them from freezer to fridge in the morning to use in the evening than try to rush the defrosting process. Then simply garnish and serve!
Ingredients
- 250g ricotta cheese
- 1c cream
- 2 egg whites
- Pinch of salt
- ¾c castor sugar
Plus…
For the plain chocolate version:
- 160 – 200g dark chocolate, chopped
- 100ml strong, brewed coffee, or 1-2T coffee granules dissolved in boiling water
Or
For the tri-colour version:
- 80 – 100g dark chocolate, chopped
- 50ml strong, brewed coffee, or ½ – 1T coffee granules dissolved in boiling water
- 80 – 100g white chocolate, 2 squares grated and the rest chopped
- 10 – 12 ripe strawberries, washed and stalks removed
- 1 vanilla pod
- 100ml milk
Method for Plain Chocolate Version
Put the chopped dark chocolate into a small bowl, then either in the top of a double-boiler or in a sieve over boiling water. Make sure the boiling water isn’t touching the bottom of the bowl though – it should just be warming via the steam. Leave it a few minutes until the chocolate is starting to melt, then gently give it a stir to help it along. Leave it a few more minutes then stir again, until it is all melted and smooth, with no remaining lumps.


Make your coffee and let it brew while the chocolate is melting.

If you would like to create some chocolate decorations, drop some melted chocolate onto a silicon mat at this point and leave it to harden. Then carefully peel off the mat.

In the meantime, place the ricotta into a biggish bowl (if you’re using a hand-held blender) or into a standing blender.

Roughly chop it up then add the cream.

Start blending the two together. It will go through a rough, grainy phase then eventually end up smooth.


Now beat the egg whites with the pinch of salt until stiff.


Add the castor sugar and beat again until the sugar is mostly dissolved and you end up with soft peaks that just hold their shape. Set this aside for now, ready to use.


Pour the melted chocolate and prepared coffee into the ricotta mix and blend until you have a smooth mixture.


Then add the beaten egg white and fold it in with a spoon, making sure there are no big lumps of egg white left, but without overdoing it so you don’t lose the lightness.


Immediately spoon into small bowls (it will already be starting to set) and refrigerate for at least 4 hours, preferably overnight.

When you’re ready to serve, garnish with the chocolate dots you created, or with extra grated chocolate or berries.
Method for Tri-Colour Version
Chop up all your ingredients and set them out, ready to use. Once you start, you will need to work quickly as the chocolate starts to set.

Now prepare your vanilla and strawberry flavours, which will both use white chocolate as the base that helps them to set:
Vanilla
Split the vanilla pod lengthwise and using the blade of a knife, scrape out the seeds. Put the milk into a small saucepan and add both the seeds and pod halves.

Gently heat until warm (don’t boil) then take off the heat and allow it to stand so the vanilla infuses into the warm milk. Discard the pods only just before you are ready to use the vanilla milk.

Strawberry
Reserve a couple of strawberries for garnish, then in a separate small bowl, blend the rest of the strawberries to make a smooth purée.


White chocolate
Put the chopped white chocolate into a small bowl then either in the top of a double-boiler or in a sieve over boiling water. Make sure the boiling water isn’t touching the bottom of the bowl though – it should just be warming via the steam. Leave it a few minutes until the chocolate is starting to melt, then gently give it a stir to help it along. Leave it a few more minutes then stir again, until it is all melted and smooth, with no remaining lumps.


Main mixtures
While you are waiting for the chocolate (keep an eye on it):
Place the ricotta into a biggish bowl (if you are using a hand-held blender) or into a standing blender.
Roughly chop it up, then add the cream.
Start blending the two together. It will go through a rough, grainy phase then eventually end up smooth.
Now divide the smooth ricotta cheese mixture into 3 equal parts, and take one part out of the bowl (which you will flavour with dark chocolate just now), leaving in the bowl the two parts that you are going to flavour with vanilla and strawberry.

Beat the egg whites with the pinch of salt until stiff.
Add the castor sugar and beat again until the sugar is mostly dissolved and you end up with soft peaks that just hold their shape. Set this aside for now, ready to use.
Start flavouring
When the white chocolate is melted, add it to the main bowl with the two thirds of ricotta mix and beat it in.


Divide this white chocolate-ricotta mix in half and put one half into another bowl.

Vanilla
Still working in your main bowl, add the vanilla-flavoured milk to the third left in there and beat it in.


Spoon about a third of the beaten egg white mixture on top and carefully fold it in, making sure there are no big lumps of egg white left, but without overdoing it so you don’t lose the lightness.


Spoon the final mix into small bowls.

Now go back to the other half of the mix which contains the white chocolate (taste it if you’ve forgotten which of the two remaining bowls it is). You can transfer it back into the bigger bowl if you like or work in a new one.

Strawberry
Add the strawberry purée and beat it in.


Spoon another third of the beaten egg white mixture on top and carefully fold it in as above.


Spoon the final mix into small bowls.

Now you can breathe for a moment… 🙂
Dark chocolate
When you’ve caught your breath, put the dark chocolate into another small bowl and melt it as per the white chocolate above.
Make your coffee and let it brew while the chocolate is melting.
If you would like to create some chocolate decorations, drop some melted chocolate onto a silicon mat at this point and leave it to harden. Then carefully peel off the mat.
Using your final third of the ricotta mixture, which at this stage is still just ricotta and cream (this third didn’t get the white chocolate as you took it out right at the beginning), add the melted dark chocolate and the prepared coffee, and mix it together.
Spoon the last third of the beaten egg white mixture on top and carefully fold it in as above.
Spoon the final mix into small bowls.
Now put all the bowls into the fridge for at least 4 hours, preferably overnight.

To Serve
Garnish:
- The dark chocolate ones with the chocolate dots you created
- The vanilla ones with the grated white chocolate
- The strawberry ones with strawberry slices
- Or whatever combination of those takes your fancy

Serve:
- One of each flavour per person, if the dishes aren’t too big; or
- Let them choose a flavour; or
- Everyone can share!
PRINT RECIPE (Print-friendly version)
© Alexandra Lawrence and Inspired Nourishment, 2014

Wow these look so tasty!!! Do you deliver? 😉
LikeLike
Thanks, I must admit I was really pleased with the way they turned out!
I might consider delivering if I thought they would make it in one piece all the way from Cape Town! 🙂
LikeLiked by 1 person
Dang, cape town is kinda far to send puddings….
LikeLike
Sadly, yes. 😦
Luckily you now have the recipe so you can make your own! 🙂
LikeLiked by 1 person
True!
LikeLike